17 October 2016

How To Convert a Physical Linux Server to Virtual Machine with VMware vCenter Converter Standalone (P2V)


        พอดีมีโอกาส ต้องทำการ ย้าย Physical Linux Server ที่ตัวเองทำไว้เมื่อประมาณ 2 ปีแล้ว ยังไม่ตาย แต่ Hardware หมด MA แล้ว ไปไว้ที่ ESXi Server (Hypervisor) ซึ่งต้องเป็น Virtual Machine นะครับ

หมายเหตุ: ผมลองกับ Production จริงๆ แล้วครับ 

Physical Server เป็น CentOS 6.6 64bit
ส่วน ESXi เป็น 5.5 นะ

เนื่องจาก ตัวที่จะย้ายไปเป็น VMware ESXi สบายหน่อยมี Tools ให้ใช้อยู่แว้ว Free ด้วย ไป Download ตาม Link นะ (ต้องใช้ Account นะครับ)
Download VMware vCenter Converter Standalone for P2V Conversion

จากนั้นก็ทำการติดตั้ง VMware vCenter Converter Standalone ลงบนเครื่อง Notebook หรือ PC เราครับ

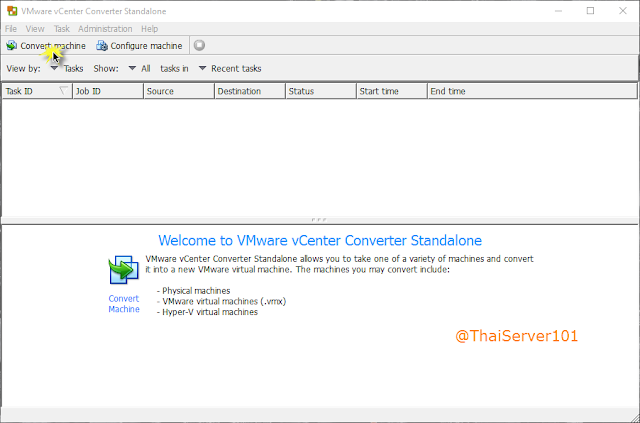
1.  เปิดโปรแกรม VMware vCenter Converter Standalone ขึ้นมาแล้ว เลือก Convert machine


How To Rate Limit Download Speed and Throttling for Apache HTTP with mod_ratelimit


ประเด็นคือผมอยาก Limit Speed ของการ Download ไฟล์บน Apache HTTP โดยใช้ Mod RateLimit

ข้อมูลเพิ่มเติม
http://httpd.apache.org/docs/trunk/mod/mod_ratelimit.html

1. ทำการ Enable mod ratelimit บน Apache (HTTP)
a2enmod ratelimit
2. ทำการ Configuration ระบุในส่วนของ URL ที่ต้องการ Limit Speed Download
vi /etc/apache2/conf-available/ratelimit.conf


3. ทำการ Enable Configure
a2enconf ratelimit
4. ทำการ Restart Apache
service apache2 restart

5. ทดสอบ Download file ขนาด 1.3GB ทั้ง Limite 500Kbps และ Unlimite ในการ Download Speed จาก Browser


เรียบร้อยแล้วครับ


How To Configure Username and Password Authentication with Apache HTTP


เนื่องจากผมต้องการ Share file บน HTTP Server (Apache2) โดยอยากให้มี User และ password

1. ทำการ update repo และติดตั้ง apache2 , apache2-utils เพิ่มเติม
root@linux:~#sudo apt-get update
root@linux:~#sudo apt-get install apache2 apache2-utils -y

2. ทำการสร้าง Account สำหรับเข้าใช้งาน
root@linux:~# htpasswd -c /etc/apache2/.htpasswd user-share
New password:
Re-type new password:
Adding password for user user-share
root@linux:~#

3. ทำการ Configure Site บน Apache2 สำหรับการเข้าใช้งาน
root@linux:~# vi /etc/apache2/sites-enabled/000-default.conf


4. ทำการ Restart Apache2
root@linux:~#/etc/init.d/apache2 restart
 * Restarting web server apache2                                                                                                         [ OK ]
root@linux:~#

5. จากนั้นลองเรียก URL path ที่ทำการ Configure ข้างต้นและใส่ user และ password ที่ได้ตั้งไว้ครับ


เสร็จเรียบร้อยครับ


URL Refer:
https://www.digitalocean.com/community/tutorials/how-to-set-up-password-authentication-with-apache-on-ubuntu-14-04